
First things first. Should anybody have the mistaken belief that I am any kind of gardening expert, may I please first refer you to my Gardening Expertise Disclaimer. Back? Good. Now we've got that out of the way...I'm working on fertilizing my grass, my roses and my flowers today. And maybe get those new plants in the ground. And speaking of fertilizer, I've been trying to get this little post up for near about a week now! So, quickly ... just a little discussion on how I'm handing the fertilizing of my new veggie gardens. Or specifically, my new raised bed, square foot vegetable gardens! {For a recap of the past posts, scroll all the way to the bottom of this post.}
Now, gotta say ... this will not be a primer on fertilizer by any means. There is plenty of information out there from people who actually know what they are talkin' about for me to even attempt to pretend I do! I'm just gonna tell y'all what I have decided to do.
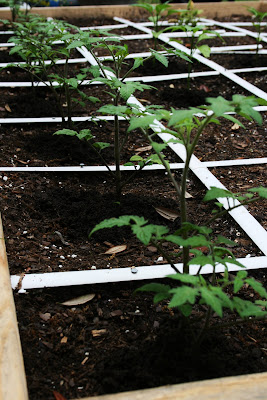
My new square foot gardens were officially one month old yesterday. So far I am lovin' this way of gardening y'all. But, you may recall that right after I planted my beds, we had a period over those first 2 weeks where it rained. Not just a little bit of rain one day, here and there, but several days in a row where it literally rained all day. Every day. For 4 days. In a row. Rain. Clouds. Zero sun. And it happened about 3 different times. While my plants were growing, some of them, especially the smaller ones that came in the 9-cell packs, were well, pale looking to me, so I felt that they needed a nitrogen boost.
First, just to recap, plants need nitrogen, phosphorus and potassium {potash} in order to grow. Those numbers on a bag of fertilizer tell you what percentages of each of these macronutrients are available in that product.
Nitrogen, the first number, is essentially for greening up. It primarily provides for healthy vigorous growth of the plant and is important for new plants. In addition to greening up the foliage to a healthy, dark green, nitrogen also supports strong root development and provides for increased seed and fruit formation and thus, higher end yields.
Phosphorus, the middle number, helps to strengthen the plant and also promotes strong root development.
Potassium, the last number, is really for helping to keep the plant healthy. It gives protection to the plant in temperature extremes and helps to defend the plant against disease.
If you've been following this series, you will recall that Mel Bartholomew, the author of All New Square Foot Gardening, recommends in his book
Well, whether it was that I didn't have the perfect mix of compost, or just that it was far too rainy and not sunny enough, but I decided 2 weeks into it, that I absolutely needed to fertilize. If you are just getting started and do not have enough sources to make up his Perfect Soil Mix, then it'd probably be a good idea to start right off with fertilizer in your beds at planting.
I just picked up with how I generally fertilize veggies, so I'll be using both Miracle-Gro and a Pennington brand of tomato and vegetable plant food, because I have plants at two stages right now.
 As you see below, Miracle-Gro is super high in nitrogen. That 24 means that 24% of the application is nitrogen. This is why sometimes when you see people who have these massive vegetable plants with beautiful green leaves, but little to no fruit setting - it is probably because they are using a high nitrogen fertilizer like this throughout the growing season. Not good! Once blossoms begin to set, using a product like this with too much nitrogen will cause your plant to go dormant on fruit {vegetable} production and you may end up with a large and very green plant, but with little or no fruit! We need to lower that ratio once the vegetable plants begins to bud and produce fruit.
All of my smaller plants that are looking pale and need to focus on growth, will get doses of Miracle-Gro, once a week, until they begin to show signs of blossoms and budding. Once that happens, I'll switch over my fertilizer to the Pennington tomato & vegetable plant food, offering them a better ratio balance for that stage.
 This is the larger yellow bell pepper that I planted. Since it is already beginning to have blossoms appear, they'll be getting a dose of the granular fertilizer instead of the Miracle-Gro. I want these plants to put most of their energy into developing some nice, large bell peppers! So, while I still want them to grow, I want less focus on growth, and more on getting established and strong. The Pennington brand of tomato and vegetable plant food has a ratio of 9-12-12, so that's perfect!
 Each plant showing signs of blossoms will get 2 tablespoons of the granular fertilizer every 2 to 3 weeks, depending on how they are doing.
 Sprinkle the granular fertilizer all around the base of the plant, taking care not to let any pile around the stem.
 Scratch the fertilizer into the soil. I just used a stick here and scratched it around, so that the fertilizer will mix into the soil a bit. Then water in the fertilizer really well right afterward! I prefer to use cup watering in my vegetable garden, rather than overhead watering with a sprinkler or hose. With overhead watering, I never really know how much water is actually getting to the root of the plant, and the foliage gets all wet too, which can promote disease. So I keep a 5 gallon bucket in the garden area, and a large cup to scoop and water directly at the root level.
 After fertilizing all of the plants, a few days later when it was time to water again, I decided to "top-dress" all of my plants with a little bit of the Black Kow composted cow manure. When I built my beds, we picked up the 8" wide lumber instead of the 6" wide, because it was easiest to get to that day, so I have a bit more height in the bed that I can manage to top dress several times. Since composted cow manure is essentially a soil improver, it'll be a nice boost for the soil and can't do anything but help the plants!
 Grab your gardening hand tools, and sprinkle a couple of shovels of the Black Kow around the base of each of your seedlings. Using your fingers, sprinkle a bit of the composted manure around your tiny seedlings too. Be sure to water it in so that it begins to creep down into the existing soil. I'm thinking I'll top dress the soil once a week for at least this early part of the growing cycle.
 And last {well, for now that is}, I'll be using Epsom salts.
  To find out more about why I use Epsom salts and specifically why I feel this helps with controlling blossom end rot on my tomatoes, gives me better pepper plants, and more beautiful roses, click right here.
Okay! Hope that was helpful to someone. Next we'll talk about pest control, but that's it for now - gotta get back to my gardening chores folks! Have a great day y'all!!
RECAP OF PREVIOUS POSTS
Step 1: Build a Box
Step 2: Dirt Mix
Step 3: Add a Grid (for Square Foot Gardening only!)
Step 4: Planning the Plants
Click HERE for all the Year One 2009 Square Foot Vegetable Garden Updates
~
**hitting myself upside the head**
ReplyDeleteI planted tomatoes last summer and fertilized them with Miracle Grow weekly, just as I did the flowers...you guessed it, they were huge and green and lovely...but very little fruit!
I'm learning so much...you are a good teacher!
WOW--that is how I wanted my garden but my husband wanted one like his dad had. We'll try it his way this year and my way next year--can't wait to get things planted. We have had so much rain that this red North Carolina clay is hard to dig!! I think it is going to be dry the rest of the week so hopefully by this weekend, I'll have a garden in. This will be our first garden in over 20 years so please wish us luck!! Thank you for all the information--I could use a refresher course on gardening. Sheila in NC
ReplyDeleteDon't worry Tammy - I did the same exact thing! Live and learn. I do use the Miracle-Gro all season on the flowers, about once every two weeks.
ReplyDeleteAnother thing to do on the vining type of tomatoes is to pinch the little suckers that appear in between main branches. That way the plant focuses the energy toward growing fruit instead of toward growing a whole bunch of branches. I also get rid of all of the lower branches on the tomatoes. It helps with air circulation which tomatoes seem to really need. Next time I go to pinching and trimming I'll get some pics and post about it.
Hi Sheila - You're so welcome! I figure I'm doing it might as well blog about it and share the info, right?
I've had the traditional row gardens and even did the square foot once, the old way where you dug down into the soil to turn it and then amended it. My soil is clay too and awful with some sand since we live right near the Gulf.
The great thing about the raised beds is NO DIGGING because you are putting in all new soil on top of the existing soil in your yard. So much better for the plants. My soil blend wasn't perfect, but it was close, and it is SO much easier to work with.
As far as the SF grids, it sure makes the garden look much better organized and neat - I really like how it looks!
I'm hoping things will be better with my harvest this year than in years past. I'm so exciting that you're giving a veggie garden a try this year!!
oh wow....I've had that rot on my tomatoes...and I never knew. I like the sqaure foot garden idea. I'll keep you posted on my dry/hot/nevada garden as I go.
ReplyDeleteI'm saving this to show to my hubby , we are planting a garden for the first time this yr an we're so excite about it!!!
ReplyDeleteGlad to help y'all!!
ReplyDeleteWow! You are awesome. I love your post. My first year with the raised bed and I have been referencing your bed since I started. Great resource. Very simple to read, detailed! Love it. Thanks for the shared info!
ReplyDeleteYou're so welcome Jodi! So glad that it's helping you. That's why I decided to document it on the blog - figured I couldn't be the only one out there doin' this - might as well share, right?
ReplyDeleteDetails? That's the Virgo in me I think LOL??!!